动态库
与静态库相反,动态库在编译时并不会被拷⻉到⽬标程序中,⽬标程序中只会存储指向动态库的引⽤。等到程序运⾏时,动态库才会被真正加载进来。格式有:.framework、.dylib、.tdb。
缺点: 会导致⼀些性能损失。但是可以优化,⽐如延迟绑定(Lazy Binding)技术
静态库是 .o 文件的合集,动态库是 .o 文件链接过后的产物。动态库不能合并。跟静态库一样,先使用一个例子展示一下怎么链接动态库。
一个 test.m 文件,文件中用到了静态库AFNetworking,我们使用clang编译器将下面的代码编译成可执行文件。
#import <Foundation/Foundation.h>
#import <AFNetworking.h>
int main(){
    AFHTTPSessionManager *manager = [AFHTTPSessionManager manager];
    NSLog(@"testApp----%@", manager);
    return 0;
}- 将test.m文件编译成 .o 文件
    clang -target x86_64-apple-macos11.1 \
    -fobjc-arc \
    -isysroot /Applications/Xcode.app/Contents/Developer/Platforms/MacOSX.platform/Developer/SDKs/MacOSX12.sdk \
    -I./AFNetworking \
-c test.m -o test.o- 将.o文件编译成可执行文件
    clang -target x86_64-apple-macos11.1 \
    -fobjc-arc \
    -isysroot /Applications/Xcode.app/Contents/Developer/Platforms/MacOSX.platform/Developer/SDKs/MacOSX12.sdk \
    -L./AFNetworking \
    -lAFNetworking \
test.o -o test- 使用
lldb运行可执行文件,会报找不到动态库的错误,如下图: 我们通过编译动态库看是什么导致了这个问题。
手动编译动态库
还是使用编译静态库的例子,不同的是我们这次需要将 TestExample.m 文件编译成动态库。
- 将 test.m 编译成 .o 文件
    clang -target x86_64-apple-macos11.1 \
    -fobjc-arc \
    -isysroot /Applications/Xcode.app/Contents/Developer/Platforms/MacOSX.platform/Developer/SDKs/MacOSX12.sdk \
    -I./dylib \
-c test.m -o test.o- 将 TestExample.m 编译成 .o 文件
    clang -target x86_64-apple-macos11.1 \
    -fobjc-arc \
    -isysroot /Applications/Xcode.app/Contents/Developer/Platforms/MacOSX.platform/Developer/SDKs/MacOSX12.sdk \
-c TestExample.m -o TestExample.o- 编译静态库
libtool -static -arch_only x86_64 TestExample.o -o libTestExample.a- 使用
ld编译动态库
    ld -dylib -arch x86_64 \
    -macosx_version_min 11.1 \
    -syslibroot /Applications/Xcode.app/Contents/Developer/Platforms/MacOSX.platform/Developer/SDKs/MacOSX12.sdk \
    -lsystem -framework Foundation \
    -all_load \
    libTestExample.a -o libTestExample
-all_load这里是必须要加的,因为默认是-no_all_load,会导致类被剥离,找不到类文件。这里在编译动态库时没有编译动态库的路径,使用-install_name参数可以在编译动态库时写入路径
- 生成可执行文件
    clang -target x86_64-apple-macos11.1 \
    -fobjc-arc \
    -isysroot /Applications/Xcode.app/Contents/Developer/Platforms/MacOSX.platform/Developer/SDKs/MacOSX12.sdk \
    -L./dylib \
    -lTestExample \
test.o -o test使用
lldb运行可执行文件,会报找不到动态库的错误,如下图: 当 dyld加载一个可执行文件,下图中的 Mach-O 相当于test可执行文件。在可执行文件中的LC_LOAD_DYLIB中,保存着动态库的路径@rpath/AFNetworking.framework/Versions/A/AFNetworking'。我们知道动态库是运行时加载的,就是dyld通过动态库的路径找到动态库进行加载的。当dyld通过路径找不到动态库时就会报错。

使用
otool -l test | grep 'DYLIB' -A 3查看可执行文件中的动态库路径时发现路径不对。
可执行文件是怎么知道动态库的路径呢?动态库在编译的时候,在动态库本身中的一个
LC_ID_DYLIB是来保存路径。使用
otool -l libTestExample.dylib | grep "ID" -A 5查看动态库的路径
使用
install_name_tool id 动态库路径 动态库修改动态库的路径,修改完成后再使用otool -l libTestExample.dylib | grep "ID" -A 5查看动态库的路径已经改变。重新编译 test 可执行文件,通过 lldb 进行加载测试,完全OK。
链接器 ld @rpath @executable_path
如果在编译动态库的时候,直接在编译时将路径写入到动态库就不需要后面那几个步骤。-install_name本来就是链接器的参数。
在之前我们修改动态库路径时使用的是绝对路径,但是在编译动态库时的路径,肯定要使用相对路径,如何解决这个问题,就需要用到@rpath
谁使用动态库,
@rpath保存的就是谁cmdLC_RPATH的值。@rpath可以保存⼀个或多个路径的变量
使用 @rpath
- 我们继续使用上面的例子,将
libTestExample.dylib动态库的路径修改为相对路径,libTestExample.dylib文件在可执行文件目录下的子目录dylib文件夹下。
install_name_tool -id @rpath/dylib/libTestExample.dylib libTestExample.dylib@rpath的值是从哪里来的呢?可执行文件中有一个cmdLC_RPATH保存着@rpath的值。 当我们使用otool -l test | grep "RPATH" -A 5查看 test 可执行文件时,并没有发现 @rpath 的值。没有查询到说明现在 test 现在还没有
@rpath的值,使用install_name_tool -add_rpath 可执行文件当前路径 可执行文件进行添加
install_name_tool -add_rpath /Users/xxx/Desktop/aaaa test- 再次查看 test ,
@rpath已经有值了,通过 lldb 进行加载可执行文件依然可以完美运行。但是可执行文件使用的就是绝对路径,依然没有达到我们的要求,我们需要另一个参数@executable_path
使用 @executable_path
@executable_path:表示可执⾏程序所在的⽬录,解析为可执⾏⽂件的绝对路径。
我们通过下面的指令将可执行文件的@rpath修改为 @executable_path。
install_name_tool -rpath /Users/xxx/Desktop/aaaa @executable_path test使用 lldb 测试依然可以运行。这样就解决了绝对路径的问题。
动态库嵌套 @loader_path
当可执行文件引用了动态库A,动态库A又引用了动态库B,这种情况我们改怎么做呢?
举一个例子,test.m -> TestExample.m -> TestExampleLog.m,如下图:  代码如下:
代码如下:
// test.m
#import <Foundation/Foundation.h>
#import "TestExample.h"
#import "TestExampleLog.h"
int main(){
    NSLog(@"testApp----");
    TestExample *manager = [TestExample new];
    [manager lg_test: nil];
    TestExampleLog *log = [TestExampleLog new];
    NSLog(@"testApp----%@",log);
    return 0;
}
// TestExample.m
#import "TestExample.h"
#import "TestExampleLog.h"
@implementation TestExample
- (void)lg_test:(_Nullable id)e {
    NSLog(@"TestExample----");
    TestExampleLog *log = [TestExampleLog new];
    [log test_example_log: self];
}
@end
// TestExampleLog.m
@implementation TestExampleLog
- (void)test_example_log:(_Nullable id)e {
    NSLog(@"TestExampleLog---%@", e);
}
@end- 首先需要将
TestExampleLog.m编译成动态库
    # 先编译成.o
    clang -target x86_64-apple-macos11.1 \
    -fobjc-arc \
    -isysroot /Applications/Xcode.app/Contents/Developer/Platforms/MacOSX.platform/Developer/SDKs/MacOSX12.sdk \
    -I./Headers \
    -c TestExampleLog.m -o TestExampleLog.o

    # 再编译成动态库
    clang -dynamiclib  \
    -target x86_64-apple-macos11.1 \
    -fobjc-arc \
    -isysroot /Applications/Xcode.app/Contents/Developer/Platforms/MacOSX.platform/Developer/SDKs/MacOSX12.sdk \
    -Xlinker -install_name -Xlinker @rpath/TestExampleLog.framework/TestExampleLog \
TestExampleLog.o -o TestExampleLog- 将
TestExample.m编译成动态库
    # 先编译成.o
    clang -target x86_64-apple-macos11.1 \
    -fobjc-arc \
    -isysroot /Applications/Xcode.app/Contents/Developer/Platforms/MacOSX.platform/Developer/SDKs/MacOSX12.sdk \
    -I./Headers \
    -I./Frameworks/TestExampleLog.framework/Headers \
    -c TestExample.m -o TestExample.o

    # 再编译成动态库
    clang -dynamiclib  \
    -target x86_64-apple-macos11.1 \
    -fobjc-arc \
    -isysroot /Applications/Xcode.app/Contents/Developer/Platforms/MacOSX.platform/Developer/SDKs/MacOSX12.sdk \
    -Xlinker -install_name -Xlinker @rpath/TestExample.framework/TestExample \
    -Xlinker -rpath -Xlinker @loader_path/Frameworks \
    -Xlinker -reexport_framework -Xlinker TestExampleLog \
    -F./Frameworks \
    -framework TestExampleLog \
TestExample.o -o TestExample@loader_path表示当前动态库所在的路径。-reexport_framework重新导出 TestExampleLog
在将 TestExample.m 编译成动态库时,由于它内部也链接 TestExampleLog 动态库,在给 TestExampleLog 动态库设置路径时,可以使用 @loader_path 避免绝对路径。它表示当前动态库所在的路径。
可执行文件中如果要使用 TestExampleLog 动态库内的方法, 通过 -reexport_framework 参数重新导出 TestExampleLog,会在com的LC_REEXPORT_DYLIB 显示导出的路径。使用otool -l TestExample | grep "DYLIB" -A 3 可以看到相关的路径信息

它们之间的关系如下图: 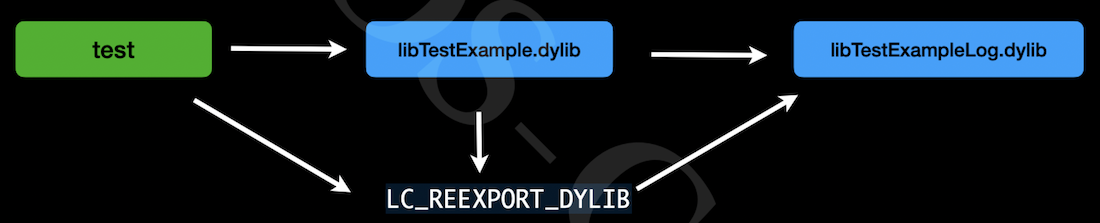
- 将
test.m编译成可执行文件
    # 先编译成.o
    clang -target x86_64-apple-macos11.1 \
    -fobjc-arc \
    -isysroot /Applications/Xcode.app/Contents/Developer/Platforms/MacOSX.platform/Developer/SDKs/MacOSX12.sdk \
    -I./Frameworks/TestExample.framework/Headers \
    -I./Frameworks/TestExample.framework/Frameworks/TestExampleLog.framework/Headers \
    -c test.m -o test.o

    # 再编译成可执行文件
    clang   \
    -target x86_64-apple-macos11.1 \
    -fobjc-arc \
    -isysroot /Applications/Xcode.app/Contents/Developer/Platforms/MacOSX.platform/Developer/SDKs/MacOSX12.sdk \
    -Xlinker -rpath -Xlinker @executable_path/Frameworks \
    -F./Frameworks \
    -framework TestExample \
test.o -o test- 通过 lldb 进行验证,可以完美运行。
我们创建一个动态库项目,在Build Settings中搜索 rpath,可以看到关于动态库相关的配置,跟我们刚才写的这些一模一样。 
tdb格式
tbd 全称是text-based stub libraries,本质上就是⼀个YAML描述的⽂本⽂ 件。
他的作⽤是⽤于记录动态库的⼀些信息,包括导出的符号、动态库的架构信息、动 态库的依赖信息。
⽤于避免在真机开发过程中直接使⽤传统的dylib。
对于真机来说,由于动态库都是在设备上,在Xcode上使⽤基于tbd格式的伪framework可以⼤⼤减少Xcode的⼤⼩
Framework
Mac OS/iOS 平台还可以使⽤ Framework。Framework 实际上是⼀种打包⽅式,将库的⼆进制⽂件,头⽂件和有关的资源⽂件打包到⼀起,⽅便管理和分发。
Framework 和系统的 UIKit.Framework 还是有很⼤区别。系统的 Framework 不需要拷⻉到⽬标程序中,我们⾃⼰做出来的 Framework 哪怕是动态的,最后也还是要拷⻉到 App 中 (App 和 Extension 的 Bundle 是共享的),因此苹果⼜把这种 Framework 称为 Embedded Framework。
Embedded Framework:开发中使⽤的动态库会被放⼊到ipa下的framework⽬录下,基于沙盒运⾏。
不同的App使⽤相同的动态库,并不会只在系统中存在⼀份。⽽是会在多个App中各⾃打包、签名、加载⼀份。
XCFramework
XCFramework:是苹果官⽅推荐的、⽀持的,可以更⽅便的表示⼀个多个平台和架构的分发⼆进制库的格式。需要Xcode11以上⽀持。是为更好的⽀持Mac Catalyst和ARM芯⽚的macOS。专⻔在2019年提出的framework的另⼀种先进格式。和传统的 framework 相⽐:
- 可以⽤单个
.xcframework⽂件提供多个平台的分发⼆进制⽂件; - 与
Fat Header相⽐,可以按照平台划分,可以包含相同架构的不同平台的⽂件; - 在使⽤时,不需要再通过脚本去剥离不需要的架构体系。
苹果设备相关架构
iOS/iPad:arm64
iOS/iPad Simulator:x86_64 arm64
Mac Catalyst: x86_64 arm64
Mac: x86_64 arm64为什么要使用 XCFramework 格式
为什么苹果会搞 XCFramework 格式呢?使用以前的方式合并不同平台的架构有什么弊端呢? 我们先通过 lipo 尝试合并不同平台的两个动态库试下。我们需要iOS真机和模拟器的动态库。
- 首先创建一个动态库项目 Demoxxx ,使用
xcodebuild指令导出模拟器和真机的动态库- 打包模拟器
xcodebuild archive -project 'Demoxxx.xcodeproj' \ -scheme 'Demoxxx' \ -configuration Release \ -destination 'generic/platform=iOS Simulator' \ -archivePath '../archives/Demoxxx-iphonesimulator.xcarchive' \ SKIP_INSTALL=NO- 打包真机
xcodebuild archive -project 'Demoxxx.xcodeproj' \ -scheme 'Demoxxx' \ -configuration Release \ -destination 'generic/platform=iOS' \ -archivePath '../archives/Demoxxx-iphoneos.xcarchive' \ SKIP_INSTALL=NO- xcodebuild 指令参数含义
markdown`-project` : 指定project `-scheme` :指定scheme `-configuration` :Release 还是Debug `-destination` :指定平台 `-archivePath` :输出路径 `SKIP_INSTALL=NO` :指定为NO时会把编译出来的静态库拷贝到输出的目录 - 作为一个SDK供应商,需要给用户提供真机和模拟器两种平台的动态库,使用
lipo将不同平台的动态库进行合并
    lipo -output DemoxxxAll -create \
../archives/Demoxxx-iphoneos.xcarchive/Products/Library/Frameworks/Demoxxx.framework/Demoxxx ../archives/Demoxxx-iphonesimulator.xcarchive/Products/Library/Frameworks/Demoxxx.framework/Demoxxx提示有相同的arm6架构不能在同一个二进制文件`have the same architectures (arm64) and can't be in the same fat output file`,一个胖二进制文件不能同时有多个相同的架构。如果我们还要将模拟器和真机平台的动态库合并在一起,就需要先提取模拟器的x86架构,再进行合并
- 使用 lipo 提取模拟器的 x86 架构
lipo -output Demoxxx-x86_64 -extract x86_64 ../archives/Demoxxx-iphonesimulator.xcarchive/Products/Library/Frameworks/Demoxxx.framework/Demoxxx- 将真机和模拟器的动态库合并成一个动态库
lipo -output DemoxxxAll -create ../archives/Demoxxx-iphoneos.xcarchive/Products/Library/Frameworks/Demoxxx.framework/Demoxxx Demoxxx-x86_64将模拟器和真机两个平台的动态库合并之后,还要后续的头文件、签名等等。太麻烦了,如果使用 xcframework 格式,我们就不需要删除或者提取不同平台相同的架构了,可以直接把所有的平台导入到一个 xcframework 文件中,文件内包含多个平台的动态库,系统在哪个平台下就使用哪个平台的动态库就可以了。打包的时候也是一样。
使用xcodebuild -create-xcframework指令制作 xcframework 文件
xcodebuild -create-xcframework \
-framework '../archives/Demoxxx-iphoneos.xcarchive/Products/Library/Frameworks/Demoxxx.framework' \
-framework '../archives/Demoxxx-iphonesimulator.xcarchive/Products/Library/Frameworks/Demoxxx.framework' \
-output 'Demoxxx.xcframework'作为SDK供应商,如果别人在使用时出现了崩溃,我们肯定是希望可以定位到代码的,所以需要提供dSYM文件,可以查看崩溃时的调用栈。如果SDK项目有开启bitcode, BCSymbolMaps文件也需要提供。
xcodebuild -create-xcframework \
-framework '../archives/Demoxxx-iphoneos.xcarchive/Products/Library/Frameworks/Demoxxx.framework' \
-debug-symbols '/Users/mlive/Desktop/aaaa/archives/Demoxxx-iphoneos.xcarchive/BCSymbolMaps/4EFF94E3-8844-38C2-957E-3AD99B43105A.bcsymbolmap' \
-debug-symbols '/Users/mlive/Desktop/aaaa/archives/Demoxxx-iphoneos.xcarchive/dSYMs/Demoxxx.framework.dSYM' \
-framework '../archives/Demoxxx-iphonesimulator.xcarchive/Products/Library/Frameworks/Demoxxx.framework' \
-debug-symbols '/Users/mlive/Desktop/aaaa/archives/Demoxxx-iphonesimulator.xcarchive/dSYMs/Demoxxx.framework.dSYM' \
-output 'Demoxxx.xcframework'-debug-symbols: 传入对应的调试文件
弱引用动态库 -weak_framework
标记为 weak imports,允许在运行时不链接该库。例如,正常情况下,动态库链接一个库文件时,如果库文件不在指定的路径中,会报 image not found。 通过 -weak-1<library name> 或者 -weak_ framework sframework name> 指定为库为 weak imports,如果在运行时找不到该库,会自动将该库的地址及内容设置为0.不会崩溃。
比如下面的项目,ViewController 中使用了第三方库SYTimer,通过 Xcode Configuration配置文件导入静态库,如果在链接时不添加参数-weak_framework,项目运行起来就会崩溃,加了 -weak_framework 之后, SYTimer 在找不到的情况下会默认为nil

- Configuration 配置文件,这里没有给出静态库的具体路径,
OTHER_LDFLAGS在链接时不添加-weak_framework参数会必崩,添加之后如果找不到静态库会默认为nil。
// 2. -F: frmaework 所在的目录
FRAMEWORK_SEARCH_PATHS = $(inherited) ${SRCROOT}
// 1. -I :头文件
HEADER_SEARCH_PATHS = $(inherited) ${SRCROOT}/SYTimer.framework/Headers
// 路径  这里没有给出静态库路径
LD_RUNPATH_SEARCH_PATHS = $(inherited)
// 3. 名称
// null -》 runtime -〉 nil
// weak_import  对 library 同样适用
OTHER_LDFLAGS = $(inherited) -Xlinker -weak_framework -Xlinker "SYTimer"库之间的链接
链接一个库的三要素:
* 头文件
* 库文件所在位置
* 库文件名称App -> 动态库A -> 动态库B 对于 App,(
动态库A正常链接,但是动态库B并不在动态库A(他链接的 动态库B)保存的@rpath 与 动态库B 的install_name 组合的路径下:动态库B的路径 二动态库A的rpath +动态库B的instal1_name解决:修改
动态库A的rpath或者 copy动态库B到指定路径中。 方式-: 修改 动态库A 的rpath 为 动态库B 的installname 之前的绝对路径:App -> 动态库A -> 静态库B 因为
动态库A生成的过程中在链接静态库B时,会把静态库B所有代码都链接进去。所以编译链接都不会报错。 如果动态库A不想把静态库B的导出符号(全局符号) 暴露出去,可以通过-hidden-l<1ibrary name>隐藏静态库的全局符号。App -> 静态库A 一>静态库B
静态库A生成时,只保存了静态库B的头文件信息或者静态库B的名称( Auto-Link)。App 链接 静态库A 后,会把 静态库A 所有代码都链接进去。但是并不知道 静态库B 的位置和名称。- 通过 cocoapods 将 静态库B 引入到 App内
- 手动配置 静态库B 的位置和名称:
App -> 静态库A ->动态库B
静态库A生成时,只保存了动态库B的名称( Auto-Link)。App链接静态库A后,会把静态库A所有代码都链接进去。但是 App(他链接的 动态库B)并不知道动态库B的位置,也没有提供rpath保存的
@rpath与动态库B的install_name组合的路径下:动态库B的路径 = App的rpath +动态库B的install_name- 通过 cocoapods 将 动态库B引入到 App内:
动态库的反向依赖
动态库的反向依赖,因为符号的作用空间问题,那么在运行时,动态库可以动态找到 App 的符号。所以只要在编译期间不报符号未定义的错误即可。可以通过 -U <符号>,来指定一个符号的是动态查找符号。